[오라클] DB 백업 및 복원, Exporting and Importing Metadata and Data
페이지 정보
작성자 서방님 댓글 0건 조회 944회 작성일 16-11-11 15:34본문
출처 : https://docs.oracle.com/cd/E17781_01/server.112/e18804/impexp.htm#ADMQS256
Example: Exporting Metadata and Data for a Table
Assume that you want to export the REGIONS table, which is part of the HR sample schema, so that it can be created, along with its data, in another schema (either in the same Oracle database or another Oracle database).
To unload the REGIONS table:
In SQL Developer, click Tools, then Database Export. Figure 10-1 shows the first page of the Export Wizard, but with entries reflecting selections that you will make.
Figure 10-1 Export Wizard: Source/Destination
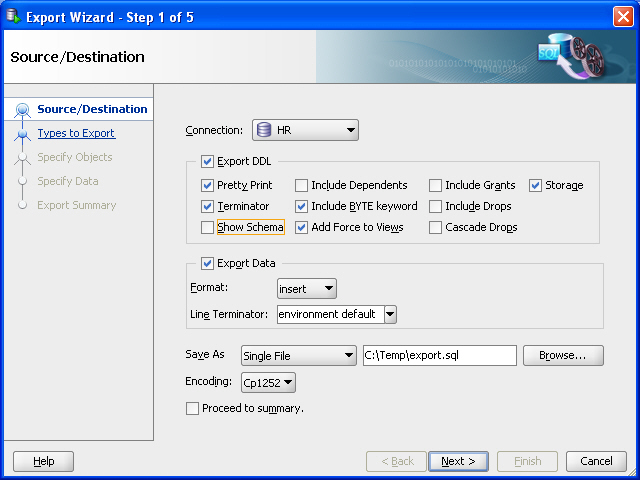
Description of "Figure 10-1 Export Wizard: Source/Destination"Accept the default values for the Source/Destination page options, except as follows:
Connection: Select
HR.Show Schema: Deselect (uncheck) this option, so that the
HRschema name is not included in CREATE and INSERT statements in the .sql script file that will be created. (This enables you to re-create the table in a schema with any name, such as one not named HR.)Save As location: Enter or browse to a desired folder on your local hard drive, and specify the file name for the script file. (In the figure, this file is
C:\temp\export.sql.) The script file containing CREATE and INSERT statements will be created in this location.Note:
For explanations of the options on this or any other wizard page, click the Help button.For example, Format has other possible values besides the default
insert, which causes SQLINSERTstatements to be included to insert the data. Other values includeloaderto cause SQL*Loader files to be created, andxlsto cause a Microsoft Excel .xls file to be created.Click Next.
On the Types to Export page, deselect Toggle All, then select only Tables (because you only want to export a table).
Click Next.
On the Specify Objects page, click Lookup, then double-click the
REGIONStable on the left to move it to the right-hand column. Figure 10-2 shows the result of these actions.Figure 10-2 Export Wizard: Specify Objects
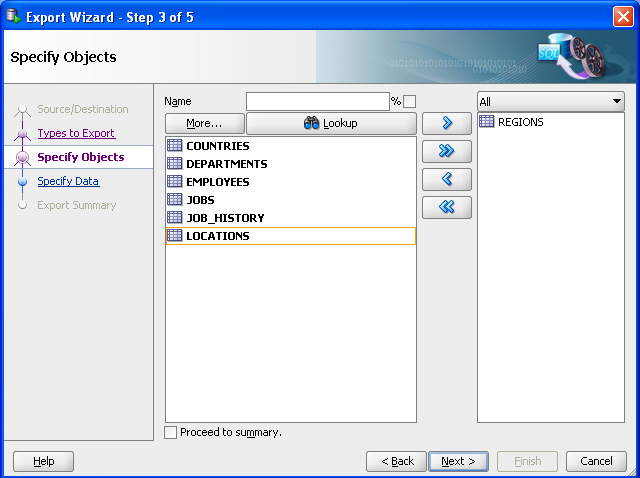
Description of "Figure 10-2 Export Wizard: Specify Objects"Click Next.
On the Specify Data page, accept the defaults and click Next.
By default, all data from the specified table or tables is exported; however, if you want to limit the data to be exported, you can specify one or more "
WHEREclauses" in the bottom part of this page.On the Summary page, review the information; and if it is what you want, click Finish. (Given what you specified, this causes the export script to be created as
C:\temp\export.sql.)If you need to make any changes, go back to the appropriate page or pages and make them, and then move forward to the Summary page again.
Example: Importing Metadata and Data Using a Script File
Assume that you wanted to re-create the REGIONS table that you exported in "Example: Exporting Metadata and Data for a Table", but in a different schema. This other schema can be an existing one or one that you create.
For example, assume that you created a user named NICK following the instructions in "Example: Creating a User". To re-create the REGIONS table in the schema of user NICK by invoking the script in C:\temp\export.sql follow these steps using SQL Developer:
If you have not already created a database connection for
NICK, create the connection.Open the
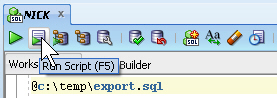
NICKconnection.In the SQL Worksheet for the
NICKconnection, type the following:@c:\temp\export.sql
Click the Run Script icon.
The Script Output pane shows that the
REGIONStable has been created and four rows have been inserted.In the Connections navigator, expand the Tables node under the
NICKconnection. You now see theREGIONStable.Optionally, click the
REGIONStable in the Connections navigator, and examine the information under the Columns and Data tabs in the main display area.
댓글목록
등록된 댓글이 없습니다.
